Introduction
After you chose Shopify as the most powerful e-commerce platform for your online business, you would be looking for ways to upload products such that you launch the store as soon as possible.
So, have you decided to add products on your own? It might sound scary for those who aren’t tech-savvy or who aren’t aware of where to begin. And that’s pretty fine!
Instead of letting the learning experience become more daunting to you, we are here to help you out on the way. Here’s a descriptive and detailed blog about how you can add and set up products appropriately on your Shopify store.
Once you’ve got a product, you need to add it to your store. Let’s go over what it takes to create your product page or add a product to your store.
How to Add Products to Shopify?
Once you’re at the Shopify admin panel, go to the Products section.
Clicking on Products will land you on a page where you need to click on the Add product button.

When you’re on this page, you will find a lot of details that need to be filled in to add a product. To add a product accurately, we’ll discuss every detail of the product page.
Step 2: Adding Product Details
The next step is to add information related to your product page. The details on your product page include:
- Title
- Description

Add a Title
If you want to work on SEO alongside adding more products to your store, start with adding keywords in your product’s title.
For some who aren’t aware of what SEO is, it is the process of increasing the visibility of a page on a search engine.
Placing focused keywords in your product’s title will help your customers experience a higher chance of discovering your product on search engines. The title that you’ll put will appear in your store as well.
Include a Description
Your product’s description is one of the best ways of explaining what your product is all about. It can help you sell your product to your target audience and grab their attention.
You can check out Shopify’s blog on the best ways of creating product descriptions. Go through it, and create an accurate description for your product.
Shopify even offers a rich text editor which can help you customize the description of your product.
Step 3: Add Product Images, Videos, or 3D Models
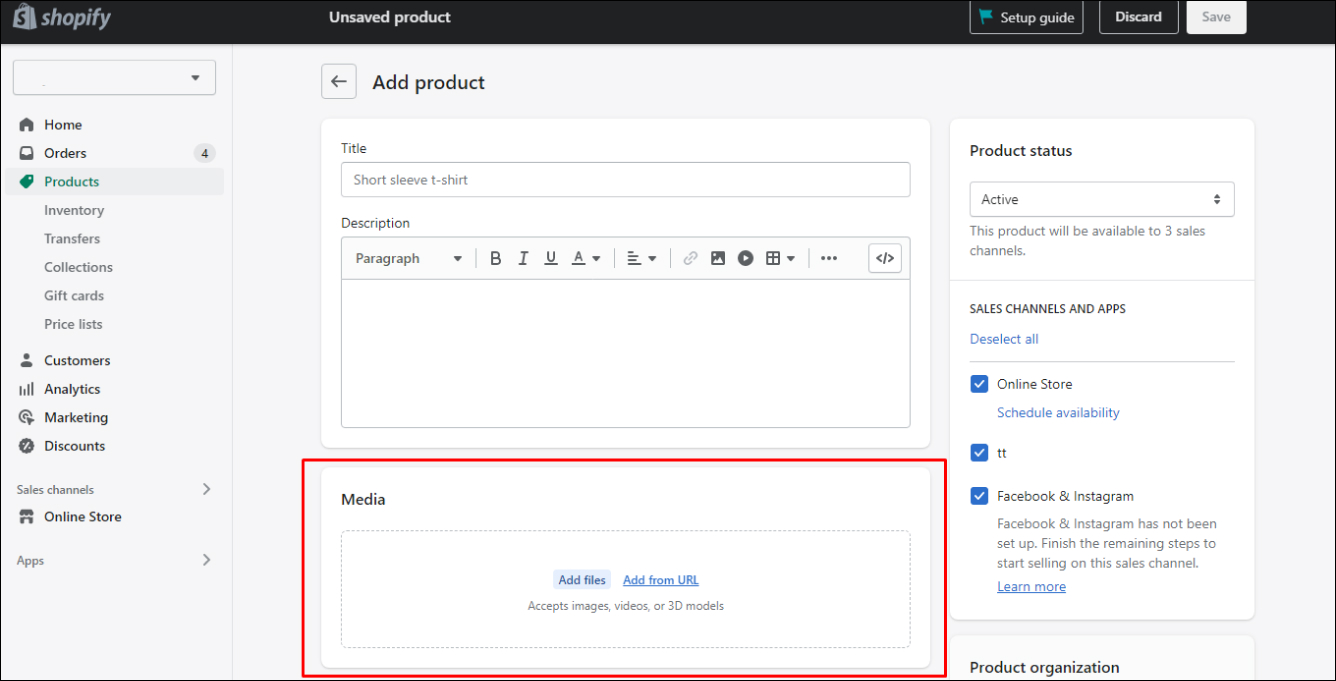
Once you’ve entered all the necessary details related to your product, you can enter the images or videos that will help the customers get detailed insights into the product they’re buying.
Images
Remember, the very first image that you’ll upload here will be the main image of the product. To upload an image, you need to click on Upload Image.
Once you’ve uploaded an image, you can preview the image, add alt text, and delete the image by hovering on it.
Keep in mind that you add your image’s Alt text. It allows you to add a brief description for your image. This way, your images can be crawled by Google and can work wonders for SEO.
Additionally, ensure that each image you upload is of high quality. Also, check if you have the required permission to use images in your store.
Videos
On the other hand, if you want to upload a video for the product, it should meet the following requirements:
- Length: Up to 60 seconds
- Size: Up to 1 GB
- Resolution: Up to 4K
- File type: .mp4 or .mov
3D Models
This is one of the most revolutionary types of media content that can upload to present your product. It gives customers the freedom to explore the product from all angles.
The requirements of the 3D Model file are
- Size: Maximum size 15 MB
- Format: GLB
Step 4: Add Product Organization Details
Once your images, videos, or 3D models are ready, the next step is adding your products to specific areas on your Shopify store. Let’s study what you need to enter here.

- Product Category
This section doesn’t ask you to be creative as the above two. All you need to do is to enter a term that classifies the product into a particular category. - Product Type
In this section, you need to enter the type of product you’re creating. For example, if you run a cosmetic company and you are creating a product page for jewelry, you might give it a product type “earrings” or “bracelets”, depending upon the product. - Vendor
If you’ve created this product, you can place your brand name in this section. On the other hand, if you’re selling another brand’s product, you can use this section to place the name of the supplier or manufacturer. - Collections
Next, you need to add your products to specific collections in your store. On Shopify, a collection can be referred to as a category. Using it, you can place your product page in any category it belongs it. - Tags
Tags can help customers to discover and search for the items. Here, you can add tags for your product. Use a comma to separate the tags.
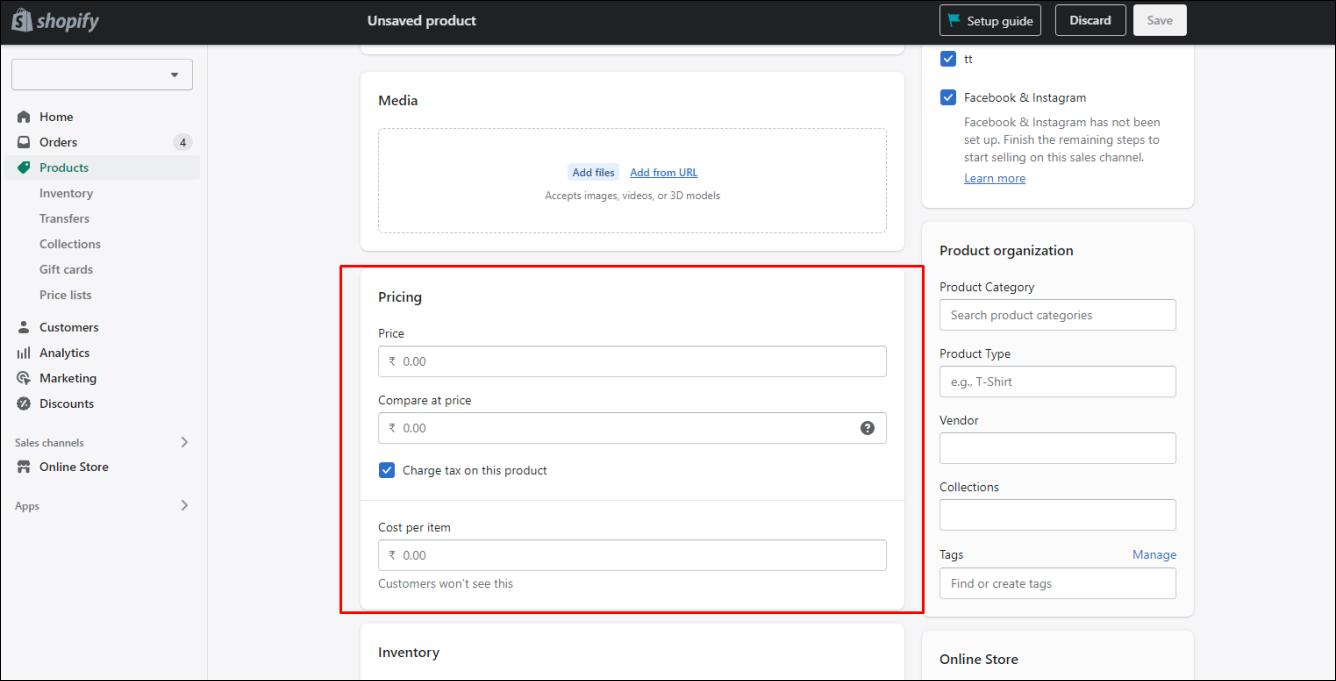
Step 5: Add Prices Details
Shopify offers you a few options while you enter a price for your products:
- Price
This is the price at which you’re willing to sell your product. - Compare at price
This is a field that can be used to grab your customer’s attention by displaying to them that your product is on sale.
On your main product page, your customers will be able to see a for-sale price and a price crossed-off. It will influence your customers to buy your products before it becomes out of stock. - Cost per item
This shows how much your product costs you in the beginning. This way, you will be able to estimate the projected margin.
Step 6: Enter your Inventory Details
Here, you can keep a track of the inventory for the store. Here, you can enter inventory details like SKU and Barcode.
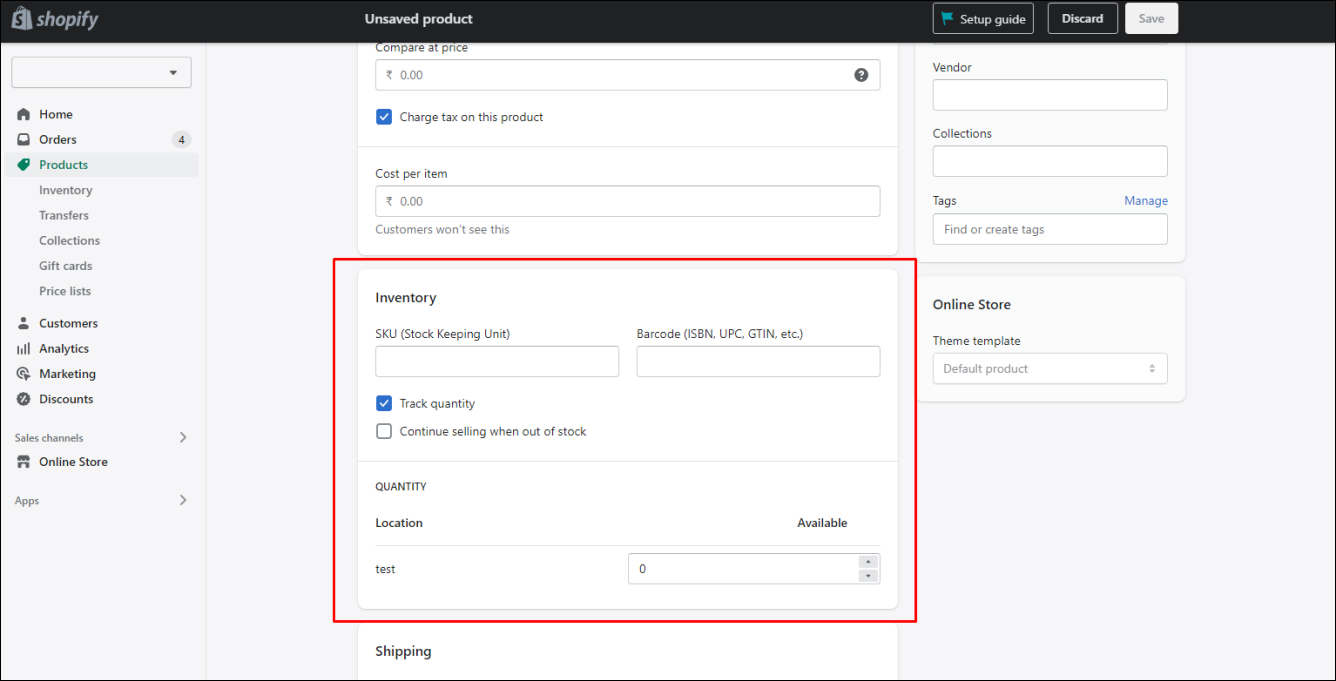
- SKU
It refers to the Stock Keeping Units which are the unique codes that can help you identify the products within your inventory. Each of the products in your store has its own unique code. - Barcodes
These are identifiers that help you locate product information. It is especially important if you’re a reseller or are willing to sell your products globally.
Step 6: Add Shipping Details
In this step, you need to add shipping details if your product requires shipping. If it does, then you need to check to tick the “this product requires shipping”. Next, you need to enter the details such as weight, Country/Region of origin, and HS (Harmonized System) code.
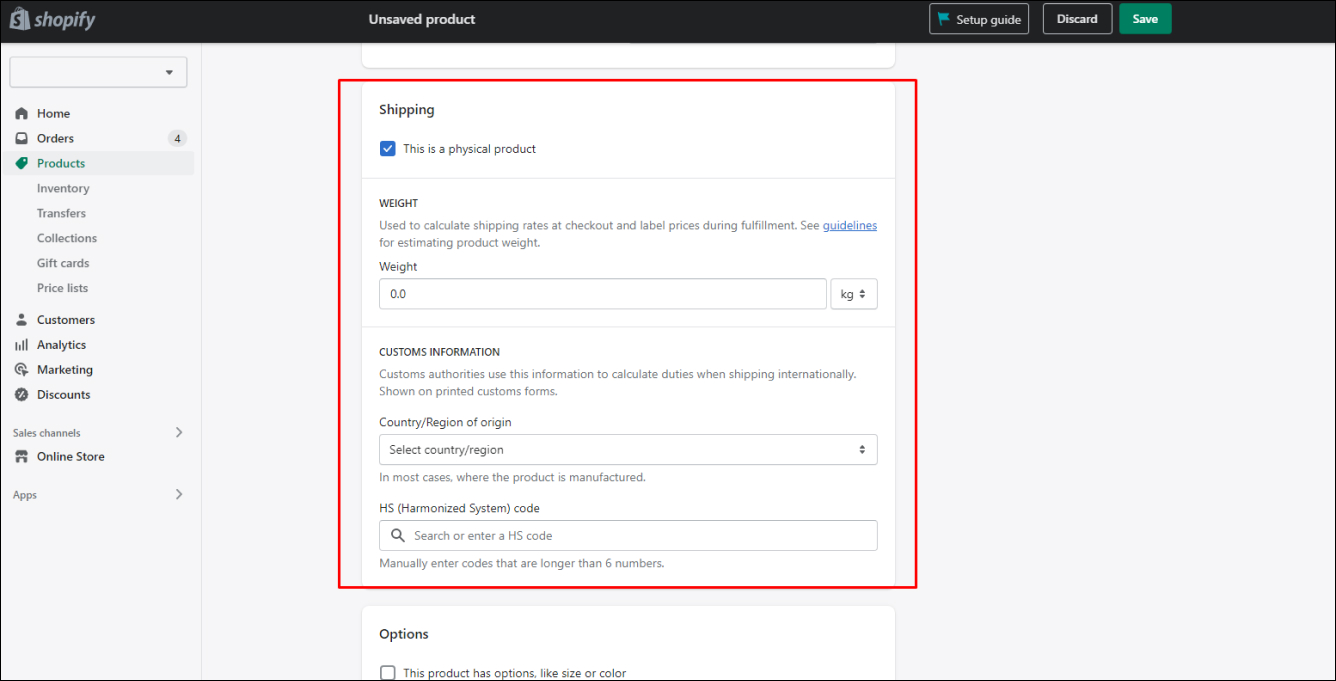
- Weight
Here, you need to enter the total weight of the product. You can set the weight in pounds (lb), ounces (oz), kilograms (kg), and grams (g). - Country/Region of origin
In this section, you need to select the country/ region where your product is manufactured. - HS (Harmonized System) code
HS code is used for the products when you are selling your product to foreign countries. Using this code, appropriate tariffs will be applied to the order.
Step 7: Add variants of the products
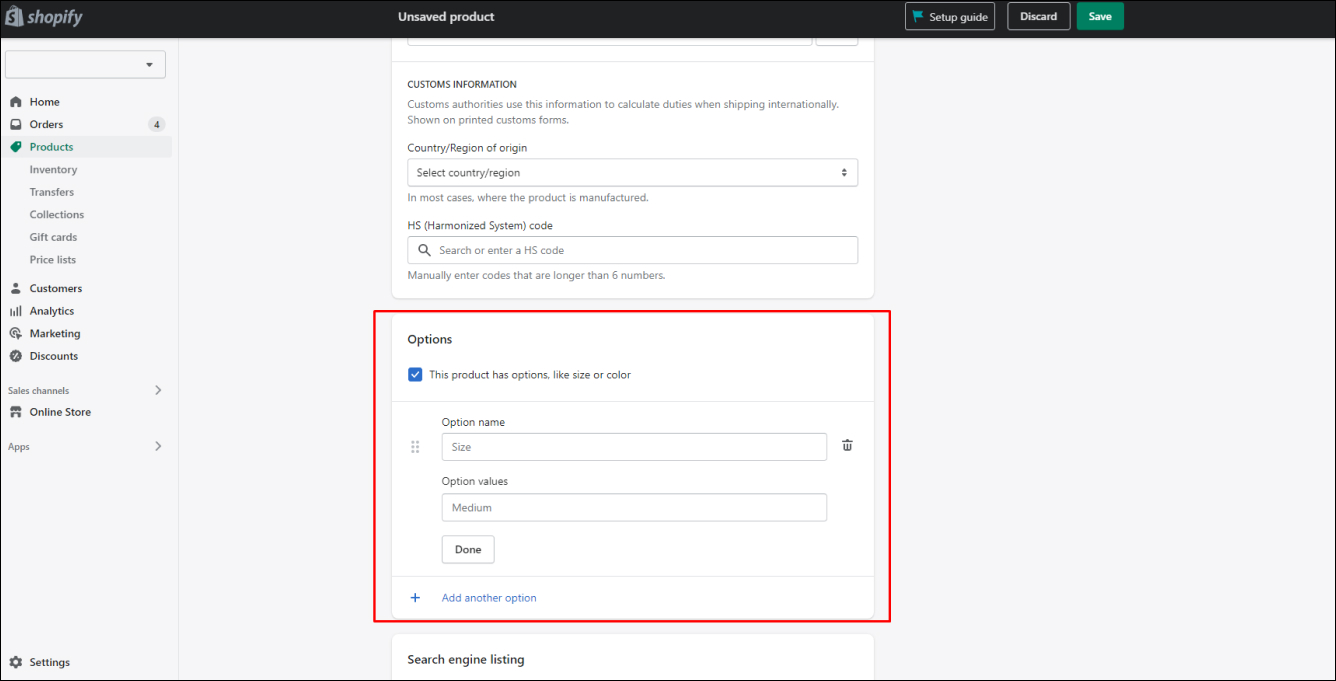
In this section, you can add the variants of your product. Generally, a product has different properties which include sizes, colors, and weight.
For example, if you’re selling a refrigerator, it comes in many sizes like 4–13 cu. ft., 14–24 cu. ft., and 25+ cu. ft., and in many colors like black, matte black, black stainless steel, bronze, and dark grey.
Step 8: Optimize For Search Engines
SEO plays a key role in determining the number of customers visiting your store for purchasing a product. Some Shopify store merchants ignore optimizing the store for search engines while on the way to add products.

Page Title & Description
Here, you need to enter the Meta description and page title information such that you get a top ranking for your product. In this, you can enter keywords related to your products.
URL Handle
In this section, you can edit your website address. You can even enter keywords relevant to the product page.
Step 9: Publish Products & View them on the Store
This is the final step. Before you click on the Save button, remember to have a quick review of all the details you have entered for your product.
Next, you can click on the View on your website option to see the preview of your product. If you find any issues, you can edit them by returning to the first step.
Conclusion
Congratulations! You’ve gone through a detailed guide on how you can add products to your Shopify store.
Adding products to your Shopify store is one of the easiest things that you can do. It isn’t a complex task if you follow this step-to-guide. Adding the most relevant details for your products can help your customers better understand what you got in store for them.
We understand that creating or setting up a product page is not at all an easy task. One requires a clear vision, detailed knowledge, and patience to achieve the required. If you feel you need help setting up your product page, reach out to us!
Are you looking to add product metafields to your product page in your store? Go through our detailed blog on Product Metafields in Shopify and let us know in the comments section whether it proved to be helpful to you.