Having too many options can be overwhelming for customers, and it can make it harder for them to make a decision.
This is known as the “paradox of choice,” which states that an abundance of options can actually make people feel less satisfied with their decisions and make them more likely to experience decision paralysis.
That’s where product filtering comes to play!
Product filtering can help mitigate this problem by allowing customers to narrow down the options to a more manageable number based on specific criteria.
This can make the shopping experience less confusing and more enjoyable for customers, which can increase the likelihood of a sale.
Additionally, providing a filter option makes it easy for customers to find what they are looking for, which can help improve customer satisfaction and make them more likely to return to your store in the future.
In this blog, we’ll gain deeper insights into what product filtering is and steps on how to create product filter options and custom filters in your Shopify store.
So, let’s dive straight into it!
What is Product Filtering in Shopify?
Product filtering in Shopify allows customers to narrow down a large number of products to a specific subset by applying certain criteria, such as price, color, size, and brand. This feature can be implemented using tags, collections, and custom filters, and it can help customers find the products they’re looking for more quickly and easily, which can improve the overall shopping experience and increase the likelihood of a sale.Why You Should Filter Your Products in Your Shopify Store?
Nowadays, people do not stay on the website for longer than 5 seconds. Let’s assume, you’ve landed on a Shopify store and it’s taking some time to find the products you want. What would be your next step? Obviously, you’ll switch to some other website. That’s why it’s crucial that you use product filters in your store. There are several reasons why you should filter your products in Shopify:- Improved user experience: Product filtering makes it easier for customers to find the products they’re looking for, which can improve the overall shopping experience and make it more likely that they will make a purchase.
- Increased conversion rates: By making it easier for customers to find what they’re looking for, product filtering can increase the likelihood of a sale, which can lead to higher conversion rates.
- Better organization of products: Filtering products in Shopify can help you better organize your products, making it easier for you to manage your inventory and keep track of which products are selling well and which are not.
- Helping customers to find products faster: If you have a lot of products, it can be hard for customers to find what they’re looking for. Product filtering can help customers find products faster and increase the chances of them making a purchase.
- Targeted marketing: With product filtering, you can segment your products by various attributes, and target specific groups of customers based on their browsing behavior, which can lead to more effective marketing campaigns and higher ROI.
How to Create Filter via Product Variants?
Shopify gives you the option to add 100 variants and 3 variant options for a particular product. To create a filter via Product Variants, follow the below-mentioned steps: Go to your Shopify admin panel and navigate to the Products section. Find and select the product you want to add variants to. Here, we’re adding variants to a product named short sleeve t-shirt.
 Scroll down to the Options section and click on the Edit button.
 Add the options like Color, Size, Material, and Style.
 Go to the variants section and add price details for every variant.
 Next, fill in the details like price, cost per item, SKU, Barcode, and HS Code. And, click on Done.
 If you want to set a specific image for a variant then you can upload it by clicking on the Add image button.
 Click the Save button to apply the changes to your product.
How to create Custom Filter via Shopify Metafields?
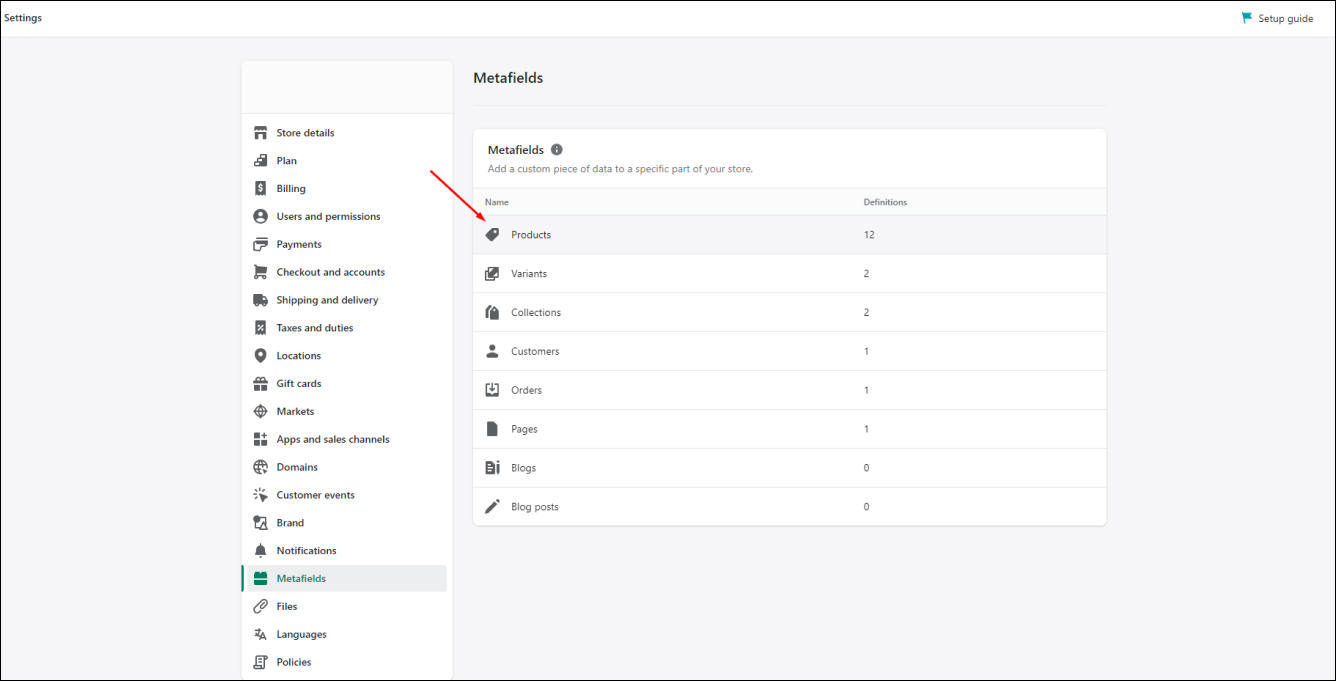
Shopify gives you 4 default options to add filters to your Shopify collection pages. If you wish to add more filters, then you need to create custom filters by creating metafields. Let’s see how you can create a filter using Shopify metafields: From your Shopify store’s admin panel, go to Settings > Metafields. Select the type of metafield that you wish to create. Here, we’re choosing Products.
 Click on the Add definition button.
 In the Name field, you need to type a name for the metafield you’re creating, such as Age Group.
You can enter a description for your metafield, but that’s not mandatory.
In the Name field, you need to type a name for the metafield you’re creating, such as Age Group.
You can enter a description for your metafield, but that’s not mandatory.
 In the content type field, select either Text or Number from the list.
If you’ve selected Text for the Content Type, then you need to select Single line text. In the other case, you need to select either Integer or a Decimal.
In the content type field, select either Text or Number from the list.
If you’ve selected Text for the Content Type, then you need to select Single line text. In the other case, you need to select either Integer or a Decimal.
 Below, in the Validation section, you can add additional rules to limit the range of accepted values, but again, that’s not mandatory.
Lastly, Save the changes.
Below, in the Validation section, you can add additional rules to limit the range of accepted values, but again, that’s not mandatory.
Lastly, Save the changes.

How to Add Custom Created Metafield in the Filter Option?
After creating a custom filter by creating a metafield, the next step is to add them to the filter options. To do so, follow the below-mentioned steps: From your Shopify store’s admin panel, go to Online Store > Navigation. To add a custom filter option, you need to install an app, i.e., Search & Discovery. It is free from Shopify that can let you add custom filters to the list.
 Next, click on Search & Discovery > Filters under the Apps section. Click on Edit Filters.
 Under Metafields section, click on the metafield that you recently created. Here, we’re selecting “Age Group”.
Lastly, click on the Save button.
Under Metafields section, click on the metafield that you recently created. Here, we’re selecting “Age Group”.
Lastly, click on the Save button.

Result
So, here’s the metafield that we created.
How to Customize the Filter on a Collection Page?
Shopify allows you to customize the filters on a collection page. Follow the steps to do so: Step 1: From your Shopify store’s admin panel, navigate to Online Store > Themes > Customize. Step 2: Choose the Collection Page from the drop-down menu that you can find at the top of the screen.
 Step 3: Now, click on Product Grid from the left sidebar.
 Step 4: At the right sidebar, you’ll find a number of settings under Filtering and Sorting.
Check mark the boxes named Enable filtering and sorting.
Step 4: At the right sidebar, you’ll find a number of settings under Filtering and Sorting.
Check mark the boxes named Enable filtering and sorting.
 Step 5: Go to the Desktop filter layout and choose whether you wish to have a Horizontal, Vertical, or Drawer layout for filters.
 Save the Changes at the end!
Top Shopify Product Filter Apps
There are many product filter and search apps available for Shopify that can enhance the shopping experience for your customers. These apps help shoppers to quickly find what they’re looking for by providing filters like size, color, price, and more. Here are some best Shopify product filter apps:1. Smart Product Filter & Search
Smart Product Filter & Search helps you improve the search and filtering experience for your customers. It allows you to create custom filters and search forms, and it also includes a live search feature that makes it easy for customers to find the products they’re looking for. Smart Product Filter & Search2. Power Tools Suite
The Power Tools Suite app for Shopify is a powerful tool that can help you improve your store’s search and filtering capabilities. It includes a variety of features that can help you make it easier for customers to find the products they’re looking for. Power Tools Suite3. Smart Search & Product Filter
The Smart Search & Product Filter app is a powerful tool that can help you improve your Shopify store’s search and filtering capabilities. It offers a wide range of features, customization options, and a free trial. Smart Search & Product Filter4. Product Search & Filters
The Product Search & Filters apps for Shopify aim to simplify the shopping experience for your customers by allowing them to sort and filter products according to their preferences. Product Search & FiltersBest Practices for Adding Filters on Shopify Store
When adding product filters to your Shopify store, you want to ensure you enhance your customer’s shopping experience and help them find what they’re looking for quickly and easily. Here are some best practices:1. Understand Your Customers
You must know your audience’s needs, preferences, and shopping behaviors to determine which filters will be most helpful for them. For instance, if you run a clothing store, your customers will likely appreciate filters for size, color, price range, and style, because these are typical factors people consider when buying clothes. A store selling electronics, however, might benefit more from filters like brand, technical specifications, price, and product ratings. Greater customer satisfaction, more sales, and greater loyalty are frequently the results of providing a more customized shopping experience through a deeper understanding of your customers.2. Keep it Simple
Do not overwhelm your customers with too many filter options. Although you would believe that providing customers greater flexibility by offering a big number of filters will enhance their experience, this can really work against you. The “paradox of choice,” which contends that having too many options can cause uneasiness and indecision, is a term that has been applied to this issue. Your objective when it comes to product filters should be to give exactly the right number of alternatives to enable clients to focus their search without complicating or overwhelming the process.3. Categorize Filters
It is a best practice in which you group related filters together to improve your online store’s usability and navigation. This practice helps your customers easily understand and navigate the filter options, especially when you have a broad range of products with many different attributes. It enhances the overall shopping experience by making it easy for customers to refine their search and find exactly what they’re looking for. For example, if you’re selling clothing, you could have categories of filters like:- Size: This would include filter options such as small, medium, large, etc.
- Color: This could have options like red, blue, black, etc.
- Price: You could set ranges for this, such as $0-$50, $50-$100, etc.
- Material: This category might have options like cotton, wool, synthetic, etc.
- Brand: This would include all the different brands you carry.
4. Use Clear Naming
You must ensure that the names of your filters are easily understandable and intuitive to your customers. This is crucial because customers need to comprehend what each filter represents immediately to effectively refine their search and find the products they are looking for. The idea is to make it as simple and quick as possible for clients to find what they want. Clear, easy-to-understand filter names are key to achieving this.5. Make Filters Easy to Use
When creating filters for a Shopify store, the user experience should be a primary concern. The filter interface should be intuitive and simple for customers to interact with. Shoppers should be able to quickly understand how to apply and remove filters. The applied filters should be visible, and users should have the option to clear all selected filters with a single click. Complex, confusing, or hard-to-use filters can deter shoppers, leading to potential loss in sales. Essentially, the filter system should assist shoppers in their product search without adding any extra load or effort, making the shopping experience seamless and efficient.6. Prioritize Important Filters
You should place the most used or most relevant filters at the top or in the most prominent position on your product filtering system. This is because customers typically prefer to use certain filters more than others based on the nature of the products. For instance, in a clothing store, filters like ‘size’, ‘color’, or ‘price’ is often more crucial than others, so they should be prioritized. By making these filters easily available, you can enhance user experience and help customers find the products they’re looking for more quickly and easily. This can eventually result in increased conversion rates.7. Show Product Counts
You must display the number of products available under each specific filter criteria. For instance, if a customer is browsing a clothes store and choose to filter by size, there would be a number next to each size option (such as Small, Medium, and Large) showing how many things are available in that specific size. This feature allows customers to understand the breadth of options available to them before they apply a specific filter. It helps them make informed decisions about which filters to apply and can prevent the frustration that comes from selecting a filter and finding a very limited range of products.Conclusion
To sum up everything, product filters play an important role for Shopify stores that offer a large variety of products. You must think about product organization in advance such that you apply appropriate filters to limit the searches for online shoppers. In Shopify, you can apply default filters on your collection pages. Also, you can create custom filters, which we’ve discussed in the blog. If you find yourself stuck mid-way, reach out to us. We’ll be happy to assist you! Do you want to customize your online store more, let’s learn how to add videos to your Shopify store!Related: Looking for professional help? Explore our Shopify theme customisation services.